Contributing
Add a project
Every real-world project here started as one markdown file in someone's pull request. This page lists exactly what to change, in order, plus the commands to check your work before you submit it.
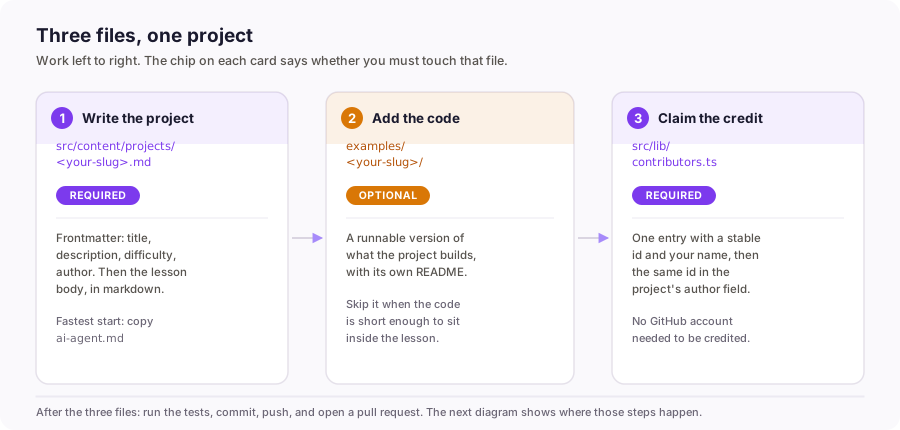
-
Check your tools
Before anything else, make sure you have what the project needs. You need Node 22 or newer (the site builds with it) and git. If a command below prints nothing, that tool is missing.
- node --version
- git --version
- If Node is older than 22, install the current LTS from nodejs.org before continuing.
You should seenode --version # v22.x or newer git --version # any recent version -
Fork the repository
A fork is your own copy of the repository, on your GitHub account. You work there, so nothing you do can affect the live site.
- Open github.com/abderrahim-lectures/python-data-analysis-course.
- Click the Fork button at the top right.
- Choose your own account as the destination.
- Wait for GitHub to finish copying (a few seconds).
- You now have github.com/YOUR-USERNAME/python-data-analysis-course.
You should seeYour browser is on your fork, and the header says "forked from abderrahim-lectures/python-data-analysis-course". -
Clone your fork
Cloning downloads your fork to your computer so you can edit files normally. Clone your fork, not the original: you cannot push to the original.
- Open a terminal in the folder where you keep projects.
- Run the clone command below, replacing YOUR-USERNAME.
- Move into the new folder.
- Install the dependencies.
You should seeCloning into 'python-data-analysis-course'... added 400+ packages in 30sgit clone https://github.com/YOUR-USERNAME/python-data-analysis-course.git cd python-data-analysis-course npm install -
Create a branch
A branch keeps your work separate from main. One branch per project, so a reviewer can see exactly what you changed and nobody else is blocked while it is reviewed.
- Pick a short name from your project, lowercase with hyphens.
- Create and switch to it in one command.
You should seeSwitched to a new branch 'add-file-organizer'git checkout -b add-file-organizer -
Copy a project as your template
Every project page is a markdown file with the same skeleton. Start from one that already works rather than an empty file: it has the frontmatter, a challenge and a quiz in the right shape.
- Copy ai-agent.md to your project's filename. The filename becomes the URL, so name it what you want the page called.
You should seesrc/content/projects/file-organizer.md is created and opens in your editor.cp src/content/projects/ai-agent.md src/content/projects/file-organizer.md -
Fill in the frontmatter
The frontmatter is the block between the two --- lines at the top. Four fields are required: title, description, difficulty and author. The tests reject a project missing any of them.
- Edit title: what the card shows. Keep it under about 50 characters.
- Edit description: one sentence, under about 160 characters, saying what the reader builds.
- Set difficulty: exactly beginner, intermediate or advanced.
- Set author: your contributor id from step 9. A placeholder is fine for now.
You should seeA frontmatter like the example below. The two --- lines must be the very first and last lines of the block.A complete frontmatter, copied from a real project:
---
title: "Build a File-Organizer Bot"
description: "Sort a messy folder into category subfolders with a bot that plans before it moves."
difficulty: "beginner"
author: your-id
---
Copy an existing project and change it. The tests check that every project has the required fields, so a missing one fails before a reviewer sees it.
-
Write the body
The body is what a reader actually follows. Every project in this course has the same shape, so readers know where to look.
- Start with a # heading and one line on what they will build.
- Add a why-this-matters paragraph: the problem before the solution.
- Add a numbered What you will do list of 3-6 outcomes.
- Break the build into steps, each with a real command and its real output.
- Add one challenge with a hidden answer (a <details> block).
- Add a short quiz (the <div class="quiz"> block).
You should seeA page that reads like the other project pages: introduction, numbered outcomes, step-by-step build, challenge, quiz.The opening of a real project body. Note that it says what the reader ends up with, then numbers the steps:
# 📁 Build a File-Organizer Bot A folder you have been dumping things into for a year. You could sort it by hand, or write the thing that sorts it. ## 🎯 What you will do 1. Scan a folder and classify each file by extension. 2. Build a dry run: compute every move, print it, touch nothing. 3. Perform the moves, handling collisions instead of overwriting. -
Add the runnable code (optional)
If your project has code worth running, give it a folder so readers can run it themselves. Projects that are mostly explanation can skip this step entirely.
- Create examples/<your-slug>/.
- Add your code file, for example organizer.py.
- Add a README.md explaining how to run it.
- Add a pyproject.toml so `uv run` works.
- Nothing here needs third-party packages unless the project genuinely requires them.
You should seeexamples/file-organizer/README.md examples/file-organizer/organizer.py examples/file-organizer/pyproject.tomlmkdir -p examples/file-organizer # add README.md, organizer.py and pyproject.toml -
Credit yourself
The contributors page is built from a registry, not from git history, so your name appears only if you add it. This also lets students without a GitHub account be credited.
- Open src/lib/contributors.ts.
- Add one entry to the CONTRIBUTORS array.
- Use the same id you put in your project's author field.
- Save the file.
You should seeYour entry in the array, exactly like the example below. The id is lowercase with hyphens and must match author exactly.One entry in src/lib/contributors.ts. The id is what your project’s author field must match:
export const CONTRIBUTORS: Contributor[] = [ { id: 'your-id', name: 'Your Name', github: 'your-handle', role: 'Wrote the file-organizer project', }, ]; -
Run the checks
These are the same checks CI runs. Run them before opening the pull request so a reviewer sees a green build, not a list of errors.
- npm run test checks the content schema, links and translations.
- npx tsc --noEmit checks the TypeScript.
- npm run build builds every page, which catches broken imports.
You should seeTests 1743 passed (38 files). No TypeScript errors. Build complete with no failed pages.npm run test npx tsc --noEmit npm run build -
Commit and push
A commit is a save point with a message. A push sends it to your fork on GitHub, where the pull request can see it.
- Stage the files you changed.
- Commit with a short message describing what you added.
- Push the branch to your fork.
You should see2 files changed, 45 insertions(+) To github.com:YOUR-USERNAME/python-data-analysis-course.gitgit add src/content/projects/file-organizer.md src/lib/contributors.ts git commit -m "content: add file-organizer" git push -u origin add-file-organizer -
Open the pull request
A pull request asks a maintainer to review your work and merge it. Describe what the project teaches and who it is for; a reviewer reads the content, not just the diff.
- Go to your fork on GitHub; a banner offers to open a pull request.
- Click Compare & pull request.
- Write a title and a description using the template below.
- Click Create pull request.
You should seeA pull request page showing your changes and the CI checks running.
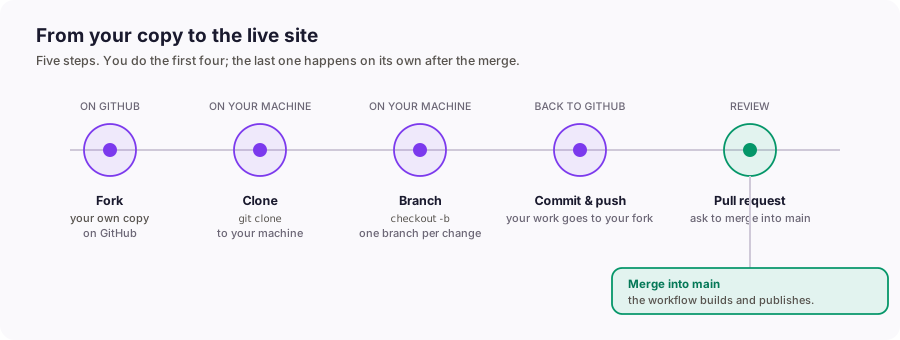
Files you will touch
-
src/content/projects/<your-slug>.mdRequiredThe project page itself. Frontmatter fields: title, description, difficulty, tags, and author (your contributor id). Everything after the frontmatter is the lesson the reader follows.
-
examples/<your-slug>/OptionalCompanion code that a reader can run locally, if the project has code. Projects that teach a concept rather than build a tool can skip it.
-
src/lib/contributors.tsOnly if you are new to the pageAdd an entry with your id, display name, and optionally your GitHub handle. Set author: <your-id> on your project page and it appears on the contributors page.
Things that get a pull request merged faster
- Teach one thing end to end. A project that builds one small tool honestly beats one that touches five libraries.
- Keep the code runnable. A reader should be able to copy a step and run it, not just read it.
- Write the pitfalls section last, from the mistakes you actually made while building it.
- Do not add a translation yourself unless you actually speak the language. English is enough; translators pick up the rest.